Showing posts with label green. Show all posts

Thursday, July 22, 2010

The Crab Nebula


smoky haze reminds me of swirling gases in outerspace

Last summer, I painted the tv/game room a pumpkin orange.

album frames are from Restoration Hardware


A couple of space themed movie posters and framed album covers 
helped turn the once bland walls into a cozy, modern, fun room
with a hint of retro appeal.

However, I was drawing blanks when it came to decorating
the large wall space behind the pool table.
Adding more album covers or movie posters seemed excessive. 

The bar mirrors that used to hang on the wall 
no longer suited the ‘family’ décor.


I had purchased a poker table for my husband over the holidays.
The table top was protected in the carton by
(2) 48"x48" x1/8" mdf boards.

They took up a lot of space but I'm glad I saved them.

After months of debating, a recent viewing of the Crab Nebula
set in motion an idea for the vacant wallspace.


One of the boards would make an ideal canvas
for my "interpretation" of the Crab Nebula and
a perfect compliment to the movie posters.


I lightly sanded the sheen with 100 grit sandpaper,
cleaned, and followed this up with 5 coats of gesso.
I also applied gesso to the back as well.

The size of this board would be expensive to frame
and the thinness (1/8") would make it display more like a poster. 

Not the impact I was going for.


My solution was to attach a hidden frame
made from square wood stakes
that would allow the board to set out from the wall,
creating a shadow effect.
  
The frame is reinforced with L-brackets
making the mdf very sturdy but not too heavy.

Picture sits out approx. 2" from the wall.

The rough cleat also provides a convenient way to hang on the wall.


I created the effects by applying acylic paint 
with rags, cellophane, feathers, and sponges.


The vibrant colors and scale of this painting did not stand out
until I added stars using qtips.

Amazing how that little detail, really transformed the picture.

Total cost, < $20. 
That pleases me the most. 

Tuesday, November 24, 2009

Ocean Pebbles

The month of Dec. presents me with many opportunities
for holiday socializing with clients after work.

If I had to pick only one accessory item this season that would
put me in a more festive mood as well as spiff up
my work attire for these after hour functions,
I would choose the cuff bracelet.
Studded Leather
Roberto Cavalli
Medina Cuff
Monica Vinader

Black Onyx
Kara Ross

Ocean Pebbles
Nonflammable

This far, I have managed to stay within the boundaries of
my significantly reduced personal spending budget.
(Negative adj. for prev. months purchase of Fiorentini and Baker Boots)
Until I find one of my wish list items in my stocking (hi honey),
I will rely upon the imposing resouces at hand.

The junk jewelry drawer.


A selection of old earrings. 
Most of these were my grandmothers.


Hmmmmm.


Not feeling it yet.

A few alterations and additions resulted in a haute mess.
I blamed my wine consumption.
Back to the cast aways

where I came up with a clearer plan.

After making my selection, I carefully remove the earring back
and the frame around the cabochon, if there is one.  For tough
settings, hold under water to loosen the old adhesive.

After removing,
clean in warm, soapy water to remove all residue.

Plan the design.

Hint: Apply thin strips of masking tape to the back
of larger cabochons to get an idea of how
the pieces will look together on the cuff blank.

You can get cuff blanks at a costume supply store
for very cheap. This one is brass and cost less than $3.00.

I use E6000 adhesive, but a two part epoxy works just as well.
Use in a well ventilated area. (OPEN A WINDOW)
I don't recommend applying pieces to the back side of the cuff.

Metal, plastic, or glass....use your imagination. 
As long as there is enough of a flat surface
to apply the adhesive, anything will work.

Use tweezers to affix smaller components.

A toothpick will clean up excess residue
without marring the surface and goop off
will help remove sticky residue from cuff base.

Let setup overnight and go back over
with a toothpick to see if any beads are lose.

I really like this assembly.
The brass beads compliment the pearl cabs nicely.

I was unable to effectively capture the lustrous details of this cuff.
It turned out so well (better than I expected), I  plan on wearing
this next week while in Quebec City.


Tuesday, September 15, 2009

DIY Fabric Cards

Photos, qoutes, meaningful words!
Send them off in a fabric card.
What you need for this diy.
Cereal boxes (heavy duty) or chip board    
Fabric remnants
Scrap (book) paper, tissue paper, wall paper...
Ribbon
Spray adhesive (use in a well ventilated area)
ruler
exacto knife
scissors
Use a straight edge and exacto knife to size your cardboard.

For this example, I cut 2 pieces of cardboard 5.5" x 7.5" to
display a 4" x 6" photo.

Lay cardboard pieces on fabric.  Cut fabric to extend 3/4" on all sides
for folding over.  Spray board pieces with adhesive.
Use a brayer or ruler to smooth the fabric.
Flip boards over, spray adhesive and fold the fabric at the corners (inward)
on to iteslf forming 45° angles, (creates a mitered corner).
 Fold all four sides on to the board.

With ruler, mark and cut your decorative paper for the inside.
Cut your paper 1/2" smaller than your board sizes.
For example, I cut my paper 7” x 5”
This forms a .25” border along the inside edge for a finished look.
Don’t glue yet.

Determine the length for your middle ribbon.
 To tie a bow, you want the ribbon to extend 6"-8" past the sides,
plus 2 times the length or width (portrait or landscape display)  
Cut 2 more pieces of ribbon to stabilize the top and bottom.
Affix ribbon and paper.
Place under heavy object for an hour.
Once you get going, it’s easy to make several up at a time

Monday, August 17, 2009

DIY Water Fountain

A fun, creative, and green, diy summer project that is easy on the budget
but has a big decorating impact is to make a water fountain.


Click on images for closeups.


Since we recently remodeled our outdoor living area,
I'm focused on adding 'comforting' details with visual appeal.


I considered purchasing a fountain for a corner space
after noticing the nearby outlet.
Unfortunately, the only fountains
I liked were $300.-$400.

I have a knack for sniffing out the priciest items.

A thrifty compromise.

My diy fountain was assembled with items we already had,
including the pump, stored away after the demise
of my husband’s salamander, Newt.


Imperfections add charm.

I had purchased this warped, plaster stand at
the thrift store last year for $3,
painted it, and was using as a plant stand, till now.

What you will need for this diy;
Submersible water pump.
You can get a pump at any home and garden center
for around $20. You will need to purchase 1/4" or 1/2" plastic tubing,
cut to length after you decide how the water will flow.


Container to hold water and deep enough to submerge your pump.
This one is approx. 4” deep.


An assortment of rocks, shells, marbles, etc… for the water to cascade down.


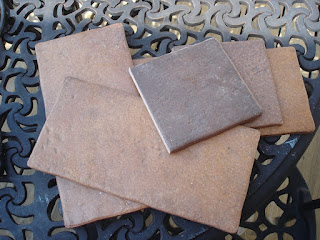
Tile remnants from a kitchen remodel.


Use rocks, tile, anything that will add height and volume.


Save your decorative pieces for the top.

Fill spaces with smaller objects like sea glass, marbles, shells...

Place your container on a stand or small table.


After it was all put together,
it didn't quite soothe me.
The base and container were a perfect unit but the colors clashed.
So I painted both pieces to resemble aged metal.

I often do things in reverse.

Sometimes this backwards thinking produces fantastic results!


Add water.


It works! Now that's harmony!

Tuesday, June 30, 2009

Green Project: Wood Art Collage

I have an accumulation of wood scaps from various home remodel projects.


Recently, my dad gave me a box of some interesting looking scraps.
Of course i couldn't say no.


I decided to make a wood collage with them
for a unique art piece to hang near our outdoor dining area.


What you will need for this diy;

½ thick plywood cut to size.
assortment of wood scraps/trim pieces
paints and stain, optional
wood sander
miter saw
wood glue
findings; hardware, kitchen utensils, nails...

I left off the fish

Square nails from the 1800's


It comes together better if the sizes and shapes are similar.

Working from the outer edges of your plywood to the center
allows for a clean finish
whether you intend to frame it or not.
You may have to layer up as you work towards the middle;
the depth adds interest.

Make sure you have a general layout before gluing.
Use a wood saw towards the end to fill gaps, or layer up.
I found it easier to paint after all pieces were in place,


and made a frame with cedar left over from our deck remodel.
If it hangs outdoors, apply a protective sealant.
Embellish your collage with your findings.

LinkWithin

Blog Widget by LinkWithin